Actually the tutorial for the photoshop version is here. By learning to do this Inkscape, you will not only learn to use Inkscape better, but will also realize that Inkscape is as good (or even better) than any commercial graphics software. I will try to make the outcome of this tutorial slightly different to avoid duplicity. (Don't worry, it still looks good!). The most important thing is that you should also try to experiment.
1) Right, boot up Inkscape.
2) Now rename the layer 1.
3) Now create a circle (F5) of radius 1710px. Align this circle to the centre of the page by going to Align and Distribute (Shift + Ctrl + A).
4) Now create an upside down acute triangle as shown, anywhere on your document. (Use Shift + 6) to use the Draw Bezier Curves and Lines tool.
My height and width for the triangle:
5) Now duplicate the triangle (Ctrl + D) and press V to flip it vertically. You should end up with this:
6) Now select both, and press Ctrl + k to combine them into one.
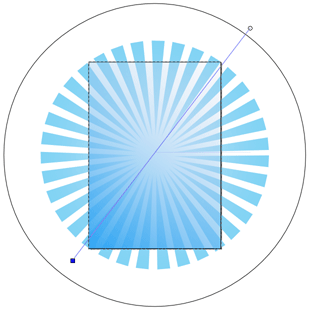
7) Now go to Edit -> clone -> Create Tiled Clones...
8) Use the following settings in the Create Tiled Clones Dialogue box:
(My graphic card was behaving funny...but its the same window)
Anyway, this is what you should have got:
9) Now delete the initial pair of triangles.
10) Pres (Ctrl + A) to select all the triangle pairs, press (Ctrl + k) to combine them into one.
11) Now select the unified piece and align it to the centre of the page. (Use the Object -> Align and distribute dialogue box).
12) Now you need to go Fill and select Radial Gradient.
13)Click on Edit... and use the following settings for the first and second gradients.
14) Ok. So, experiment with it, and see which colours go well. Now create a rectangle, that's the size of the page:
15) Now, go to its Fill and go to linear gradient.
16) Press (Ctrl + F1) to edit the direction of the gradient. Make the direction diagonal. Edit the colors of the individual nodes of the gradient. This is what I have for the top-right and the bottom-left node respectively:
17) Ok! Here comes the fun part. Create a new layer above the old one, and rename it hearts, and lock the old layer.
18) Using Bezier curves tool, create something like this:
19) Press F2 to edit nodes. Select the right most 2 nodes, and align the nodes vertically, in the Align and Distribute Panel (Shift + Ctrl + A).
20) Use the Make selected nodes smooth tool, to make the shape look like half a heart. You may need to add an additional node, like mine:
21) Press Ctrl + D to duplicate the half-heart and press H to flip the duplicate horizontally. While pressing ctrl move the duplicate to the right so that the heart looks whole.
22) Select both halves and press Ctrl ++ to combine them.
23) Now go to edit nodes, and delete unneccessary nodes. This happens when the overlapped halves are unified. a work-around for this is to use grid snap, but I haven't tried it so far.
24) Align the heart to the centre of the page.
25) Now go to Fill and stroke and select linear gradient.
26) Use the following gradient combinations. (I started the gradient from bottom up):
Here's what you should have ended up with:
27)Now got to Stroke Style and use the following settings:
28)Now duplicate the heart, and scale down the duplicate. Remove the border, and create a new gradient fill. Here's what I got:
29)Ok....so it looks pretty good now. But it's a lonely heart, no? Duplicate the larger heart, and scale it down big time. Make it something like this:
30)Create a new heart from scratch, shaped like this:
31) You probably have mastered the gradient tool by now, so add a couple of gradients to the hearts:![]()
32)Make a whole trail of hearts, or go experiment!
33)Now we need to make a gradient trail. Do this by using Draw bezier curves tool (Shift + F6), and create a quad,and edit its gradient to make it like this:
34) Change its z-order (Page Down).
35) End up with something cool like this:
Starting to look pretty neat eh?
36)Ok...duplicate any of the new hearts you have made, and transform it to look like this:
My height and width for it are 74px W and 87px H
37)Create a rectangle with no fill or stroke like this, and use the align vertically button to align both objects vertically:
38)Now select both objects and group them together (Ctrl + G):
What we have just done is that we have moved the centre point away from the middle of the heart....so now its somewhat like a barycentre between the two objects. You will see why I have done this in a moment.
39) Go to Create Tiled Clones and make the columns 6 this time in the Symmetry tab.Go to the Shift tab. There the shift x value for the Per Row and Per Column should be both -100% Go to the rotation tab and in the Per Column input box type 60. Click create and voila!
Now if hadn't used the invisible rectangle, the hearts would have rotated around their own centres.
40) Ok...group the hearts and you may need to scale the group down, to end up with this:
41) Is it just me, or is someone else also finding the steps repetetive?
I'll assume that you can get this far, using the techniques I have showed you:
42)Ok, now you need to create a circle, align its centre to the new star shape you have just created, and change its circular gradient, so it looks like this:
You will need to add many starts and stops in the gradient tool. After doing so, use the gradient editing tool (Ctrl + F1) to move the nodes of the gradients about.
43) Ok..in the original photoshop tut. it imports series of brushes for the floral design. What I have done is that I have converted two photoshop brushes into a vector in inscape. I would have posted the svg files here, if I could, but unfortunately wordpress.com doesn't allow me to post such file types. So that means that you have to do the hard work yourself.
Import the following two files into inkscape (click on them to expand in your browser):
44) Now select one picture and go to -> Path -> Trace bitmap.
Select the brightness threshold, and set it to 0.14.
Click Update.
Delete the bitmap.
Scale down the vector, and maybe move it around a bit, and send it back behind the hearts.
Repeat it for the next bitmap.
Did you end up with this (Click on it to get a bigger view) ?:
Ok...add some pretty text, and send this as a card to your bf or gf complimented with swiss chocs and flowers and make their day!
Hope you have enjoyed reading my tutorial! Comments and suggestions are welcome. Oh yeah, I may have made many grammatical mistakes....please advise me on those....I only managed a 610 in my SAT verbal.
Donate $1.50 for the development of this website and receive the original Inkscape svg file from me as a recognition gift!
Funds collected will be used for the development (like getting a proper domain name first of all!) of this site. Don't forget to mention your name and email address so that I can email you the file.















13 comments:
Really fantastic tutorial.. Thank you!
But I have two questions:
- How to define the circle radius in Inkscape to 1710px?
- and what is the use of the first circle? I don't see that you mention it in any step that follows..
Hi red bird,
What you can do is create the circle, then select the circle, and making sure the X and Y fields at the toolbar are locked, you can enter 1710 px in any field. Hope this helps!
Great tutorial. Keep up the good work!
Thanks for the great tut. This was just what I needed to make a Valentine's Day card.
Hi Fofonov & Aija, thanks for your comments!
Great tutorial!
But I'm very stuck at step 41.. how the heck do you make those flowers? I tried it every way I can think of, but just can't get it done.. frustrating!
Hope you can help!
Hi, heart is very beautiful. And how could i get this allready finished.
I need it for school. Pleas help. Answer me and i will give me e-mail!
nice.. ^_^
Row! Great Tutorial an great artwork! I really love it!
Inkscape rocks. I love Inkscape. Its too simple. Too easy. And your tutorial is awesome. Great.
I ask your permission to add the url of your tutorial in my blog which is related with Inkscape and GIMP: http://goo.gl/lQ5dq
Amazing.... thank's for this tutorial
Post a Comment